Designite (C#) console application
Note
This version is archived and no longer supported. We have transitioned from the older .NET Framework-based applications to a modern .NET console application.
Designite offers a powerful console application that supports analyzing projects and exporting results in CSV and XML format. It allows a user to analyze trends with a rich set of options. Specifically, the new console application offers the following capabilities:
Analyze C# solution/projects and export the analysis results (architecture, design, and implementation smells as well as class and method metrics) in CSV or XML format.
Conduct a trend analysis by analyzing different versions of C# solutions and exporting the results.
Carry out a trend analysis of a Git repository.
Exempt specific projects from the analysis for more relevant results
Analyze a solution/project
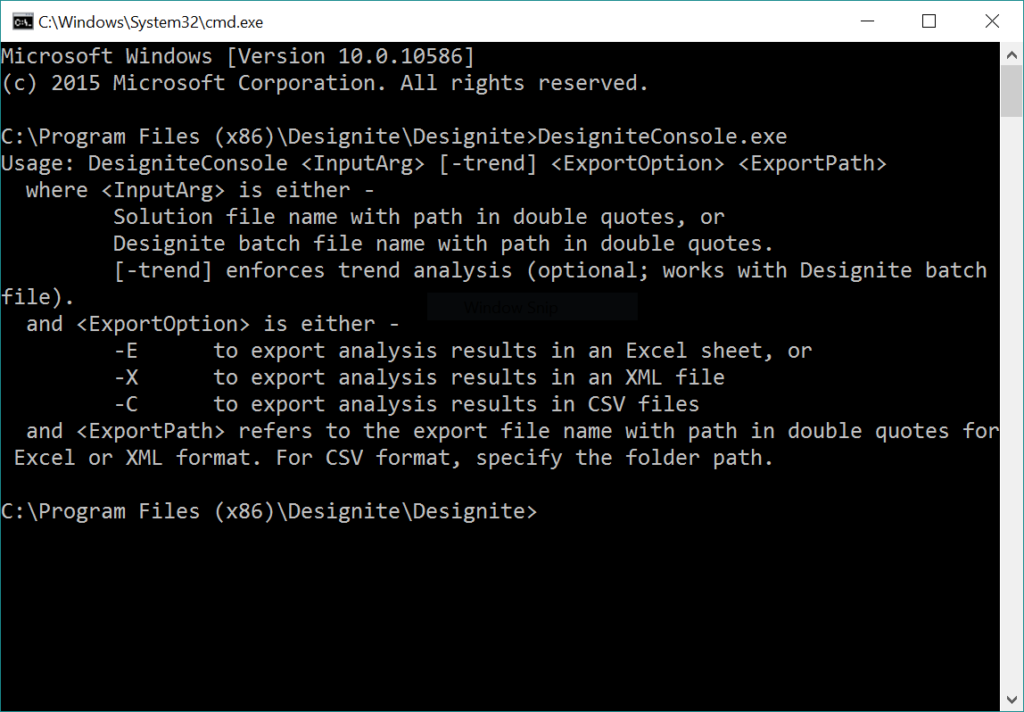
The console application provides the usage instruction when you execute it without any parameters.
To analyze a C# solution and to export the analysis results in the default (CSV) format, you can use the following command:
DesigniteConsole.exe "c:\Workspace\xunit\xunit.vs2015.sln" "C:\temp\"
You may specify the export format explicitly as follows:
DesigniteConsole.exe "c:\Workspace\xunit\xunit.vs2015.sln" −C "C:\temp\"
Use –C for CSV and –X for XML format. The following command can be used to emit the results in XML format.
DesigniteConsole.exe "c:\Workspace\xunit\xunit.vs2015.sln" −X "C:\temp\xunitResults.xml"
Tip
You need to specify the path of a file when you want the output in XML format and the path of a folder when you want the output in CSV format.
Analyze a subset of projects in a solution
When you analyze a C# solution, the application tries to analyze all the C# projects that are part of the solution. What if you wish to analyze only a few specific projects? It’s pretty easy with the application. Create a batch file containing the path of C# projects you want to analyze (one project in one line). An example of such a batch file is given below:
[Projects]
c:\Workspace\NUnit−3.0.1−src\src\NUnitConsole\nunit3−console\nunit3−console.csproj
c:\Workspace\NUnit−3.0.1−src\src\NUnitEngine\Addins\vs−project−loader\vs−project−loader.csproj
c:\Workspace\NUnit−3.0.1−src\src\NUnitFramework\mock−assembly\mock−nunit−assembly−4.5.csproj
It is important to mention [Projects] tag to help the application identify the specific projects to analyze. The following command can be used to analyze the above batch file.
DesigniteConsole.exe "C:\Workspace\NUnit−3.0.1−src\DesigniteTest.batch" "C:\temp\"
Trend analysis
The console application also supports trend analysis. Create a batch file containing version and solution file path in a line separated by a semi-colon to perform the trend analysis. An example of such a batch file is given below.
[Solutions for trend analysis]
2.6.3;C:\Workspace\nunit\NUnit−2.6.3\nunit.sln
3.0.0;C:\Workspace\nunit\NUnit−3.0.0−src\nunit.sln
Obviously, it is important to mention [Solutions for trend analysis] before specifying version and path of a solution file. Specify the following command to initiate the trend analysis:
DesigniteConsole.exe "C:\Workspace\nunit\test_trend.batch" −trend "C:\temp\"
The second parameter -trend states that you are interested in trend analysis and the third parameter is the path of the folder where the result of the analysis will be produced in CSV format.
It is often required to exclude specific projects from the trend analysis. You can specify project names (case sensitive) under [Exempt projects] tag to achieve the same. A project name containing one of the strings specified under the exempt projects tag is excluded from the analysis. For instance, we can exclude all the projects containing “test” in their names by specifying it under the exempt projects tag as follows.
[Solutions for trend analysis]
2.6.3;C:\Workspace\nunit\NUnit−2.6.3\nunit.sln
3.0.0;C:\Workspace\nunit\NUnit−3.0.0−src\nunit.sln
[Exempt projects]
test
Trend analysis for Git repositories
The Designite console application can analyze a Git repository and produce trend analysis results. You need to provide a few details in a batch file such as the path of the Git repository and path of the temporary folder. Here is a sample batch file that can be used to carry out a trend analysis for a Git repository.
[Git repo path]
C:\Workspace\xunit
[Git bash path]
C:\ProgramFiles\Git\git−bash.exe
[Temp folder path]
C:\Dev\Designite\temp
[Versions]
399ea8c
3fdea50
6f6776a
You need to specify the path of the Git repository under the [Git repo path] tag. You must also provide a path to the Git bash console and temporary folder. The Designite console application uses Git bash to work on a specific version of the code; therefore, you need to provide the path of the Git bash console. The application also makes copies of the Git repository and thus requires a temporary folder to work with. Further, you must specify the commit hash for the versions you want to analyze.
The following command will produce the trend analysis report.
DesigniteConsole.exe "C:\Workspace\nunit\test_trend_git.batch" −trend "C:\temp\"
There is another exciting feature that the Designite console application supports. If you want to analyze N number of versions distributed across all the committed versions in a Git repository, you can do it easily with the application. Specify the number of versions with [Auto choose versions] tag in a batch file and leave the rest to the console application. Here is an example of such a batch file.
[Git repo path]
C:\Workspace\xunit
[Git bash path]
C:\ProgramFiles\Git\git−bash.exe
[Temp folder path]
C:\Dev\Designite\temp
[Auto choose versions]
5
Here, the application will choose five different versions from the specified repository distributed almost uniformly since the first commit in the repository. This feature is particularly useful when you wish to analyze a large number of repositories automatically.